Limitations of Film or digital sensor
Try to keep in mind the range of light that your film or digital camera's imaging sensor will capture. A dark subject on a white beach for example has such a wide range of exposure that it is all but impossible to capture enough detail in this sort of image.
One technique that is becoming popular to day deals with dynamic range. Say for example your photographing a scene with high contrast and five or more F-stops range in exposure. Raw digital files have a lot of latitude but not that much. Thats why photographers today set their cameras to auto bracket and shoot 7-9 exposures of the same scene. The F-stop is the same to maintain depth of field. The shutter speed is bracketed in 1 stop increments. In all you want a good exposure and three that are over and three that are under. A TRIPOD IS REQUIRED for this style of photography.
One thing you can do when creating images is try to keep the sun behind you or at least 90 degrees to your side. Thee techniques produce the best landscape photographs.
The Rule of Thirds
Position key points of interest in a landscape on the intersecting point between imaginary ‘third’ points in an image and you’ll help give your image balance and help those focal points to really capture attention.
Avoid putting the horizon in the middle. Instead place the horizon in the upper or lower third of your shot.
Foreground Mid-ground Background
One element that can set apart your landscape shots is to think carefully about the foreground of your shots and by placing points of interest in them. When you do this you give those viewing the shot a way into the image as well as creating a sense of depth in your shot.
Ansel Adams, the famous B&W landscape photographer stresses the importance of making compositions that had foreground, mid, and background elements. It creates depth, scope, aids in composition and helps tell the story of the image.
Another element to consider is the sky. Most landscapes will either have a dominant foreground or sky – unless you have one or the other your shot can end up being fairly boring.
Diagonal & Leading Lines
Using converging lines can draw the eye of those viewing an image into it and to the main focal point. The lines could be the shape of a path, a line of trees, a fence, river or any other feature in an image.
S-curves
Using lines that are elegant and that resemble an S also serve to draw the viewer into the image and provide places for the eye to go leading it to the main focal point of the image.
Geometric Shapes
By positioning key aspects of a landscape on points of a geometric shape you can help create a balanced composition.
Framing Images
Adding interest to the foreground is an important technique for adding interest to landscape shots – a similar technique is to ‘frame’ the shot by adding interest to other parts of the edges of an image.
Perhaps the most common way of framing a landscape shot is to include an overhanging branch in the upper section of a shot. Similarly framing a shot with a bridge might work.
The benefits of framing pictures include:
1. giving the photo context (for example framing a scene with a lava flow can convey a sense of being out in nature in Hawaii).
2. giving images a sense of depth. (foreground, mid& background)
3. leading the eye towards your main focal point.
4. intriguing your viewer. Sometimes it’s what you can’t see in an image that draws you into it as much as what you can see in the picture.
Frames for photographs come in all shapes and sizes and can include shooting through overhanging branches, lava, foliage, etc. Your frame doesn’t need to go completely around the edges of your image – they might just be on one or two edges of your shot.
If you do use framing techniques you also need to consider whether you want your frame to be in focus or not. In some instances a nicely blurred frame will really add a sense of mood and depth to your shots (in this case use a large aperture) but in other cases to have your frame in focus can help with adding context to the scene (in this case choose a narrow aperture.
Adding Movement to landscapes
Movement adds mood and drama to an image. Wind, waves, waterfalls, birds flying , moving clouds. Use slow shutter speeds to soften the feel of waves lapping on the sand, and feel the action of the birds wings.
Take your time and look for several different points of view. When going to scenic places try to look for new angles. So get on a step ladder, or try looking from from a low perspective. Explore the environment and experiment with different view points and you could find something truly unique.
High Dynamic Range
This is a relatively new concept in photography that allows photographers to use the best information relating to shadow and highlights throughout a wide range of exposures. This is great for situations with there is great contrast. Software is available as a plug into photoshop to make the process fun and creative. Photomatix is the industry leader and allows their software to be downloaded for free for trial use.
Set the camera to auto bracket to 7 or 9 stops, then select one stop as the increment of exposure added or subtracted to each exposure. Also set the camera for aperture priority with a decent depth of field like F8. The camera will then set the shutter speed for each exposure during the auto bracket. Maintaining the F-stop will make sure all images have same depth of field.
Tripod
A light weight carbon fiber tripod with a ball head is a great tool to insure your images are sharp. It provides a steady platform for you to depress the shutter and minimize camera shake caused by body movement. Tripods allow you to use slow shutter speeds, as well as a variety of heights for different points of view. Tripods also make it easier to create multiple exposure panorama style photographs as it maintains the same angle throughout the range of exposures making it easier to align in photoshop.
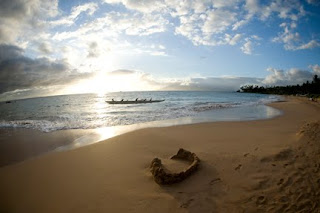
First and last light is the best of the day – GOLDEN LIGHT
Sunsets and sunrises that are facing the horizon in which the sun is going to rise or set on usually look best if there is water or something reflective in the foreground as a compositional element. In Hawaii for example lava rocks, trees,and even dogs work well.
If the sun does not have a layer of clouds in front of it, the contrast in light intensity between area around the sun and the edges of your composition will be extreme. Some very dramatic sunset and sunrise colors can be captured by finding a scene that is on the opposite horizon from where the sun is actually rising or setting.
This type of composition allows the soft directional light of pre and early sunrise or early and post sunset to evenly illuminate the entire scene. Clouds can help reflect these colors and add content and texture to the sky.
Enjoy and have fun. douglas

